That New Appliance Smell
(a.k.a. Another Knife Blog/Make It Your Own)
When I set out to write this blog I truly had no idea I’d be talking about a refrigerator.
Long-time readers of the SURLY blog will note, however, that we take on all kinds of topics. Which is rather unique for a bike company. Then again, SURLY is a unique bike company.
It’s been a while since I’ve published a blog. It’s been even longer since I’ve written a knife blog. Over five years, in fact. That previous entry was a lot of fun. I took a vintage knife that belongs to our art director, A-Wood, and transformed it from an antique letter opener back into a usable camp knife. It’s rewarding to resurrect old tools.
But let’s get back to that refrigerator.
We frequently toss around the phrase “Make It Your Own.” That slogan was inspired by you, the folks who ride our bikes and use our gear, as well as all the nifty photos shared showing how you outfit your SURLY rides to be a unique reflection of your needs and personalities.
Now, simple phrases like “Make It Your Own” can be lost on some. Words aren’t three-dimensional depictions after all. Ever wonder why analogies are so popular?
As I was beginning to compile my material for this essay the Surlyville fridge lost the good fight. Sigh. It sat warm and fetid with only the damp carpet to show for all its past chilling successes. A plan was hatched and we soon welcomed a new resident into our domain.
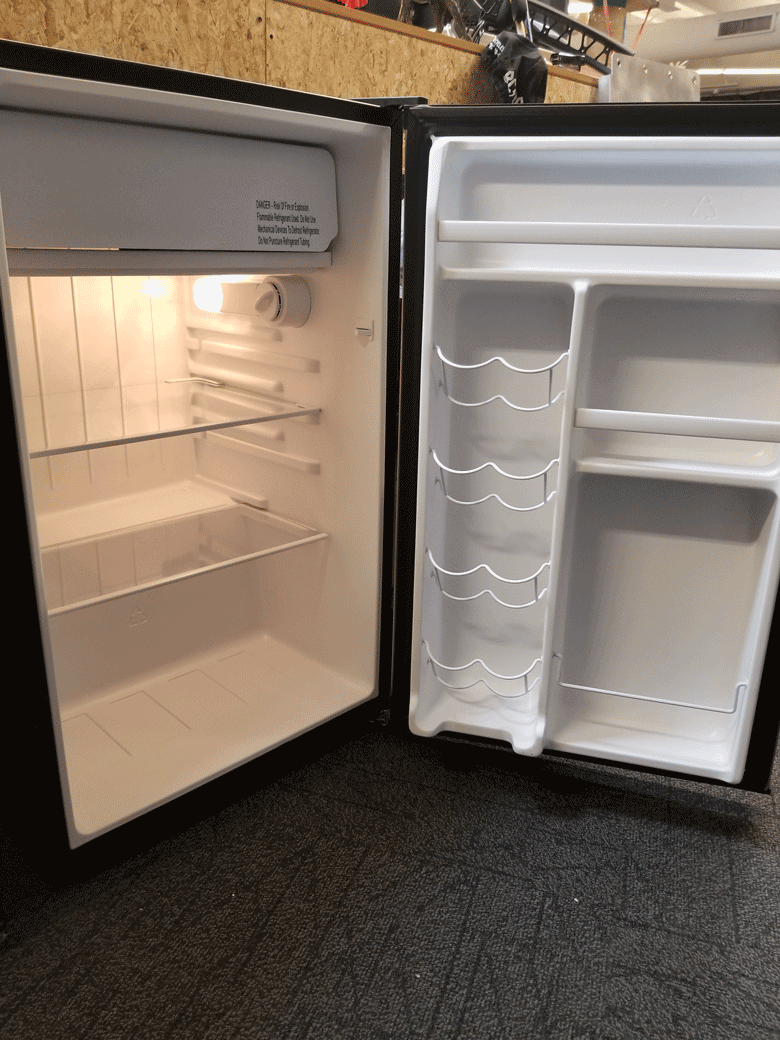
I commemorated its gleaming newness with this photo. So much pristine potential completely devoid of malodorous intent. A model citizen of Surlyville! For now.
The arrival of Chillenstein’s Child (what, your fridge didn’t have parents?) might seem immensely unrelated if it weren’t for chronology. Because right around that time is when the realization hit me.
“Make It Your Own” is like getting a new refrigerator. I know! It’s so obvious, right?
Think about it. At first, that new refrigerator is all shiny and clean. A blank, scentless slate. First you fill it with the basics. At that early stage you really appreciate the spartan look for its uncluttered simplicity. You might even think you’re going to maintain it that way for, like, EVER because it’s so cool to have a clean fridge!
But what happens after you bring home take-out a dozen times? Or you make too much chili mac and cheese, slide the surplus into the deep, and forget about it? The mustard bottle explodes. You throw a party and your friends leave who knows what in there — shoved to the back, out of sight, and left for dead.
Before you know it that once sparkling icebox is “lived in.” Not that that’s a bad thing. Because along the way that humble appliance has become a reflection of culinary side roads, remnants of good memories made with friends, a reminder that a bulk buy of pumpkin spice hummus isn’t so wise. (Why is that even a thing? Seriously.)
After you’ve lived with that fridge for a while you’ve quite literally made it your own. You might just discover yourself entertaining new ideas as you peruse its contents.
Case in point: One night you ask yourself, “Where did those capers come from? And that little plastic ball of lemon juice?” “Well, Self, I guess I’m trying my hand at making chicken piccata.” BLAMO!
Alright, alright. I hinted that this was a blog about knives, so I’m going to get to the point. The refrigerator stuff was a red herring. Don’t worry — I’ll soon cut to the chase. Right after I tell you that it’s not actually a great idea to keep red herring in your fridge. Of course, your tastes may vary.
***
Once upon a time it occurred to me there are two types of people in this world. Those who carry knives in the woods and those who ask me if I have a knife they can borrow when we’re in the woods.
Those of us who choose to carry knives are sometimes consumed by the question: What’s the best knife to carry? To which there is only one correct answer. The best knife to carry is the one you have with you when you need it.
Still, some knives are better suited to specific tasks than others. For example, I dabble in traditional bushcraft skills, which for many years have informed my knife choices. While the moniker “bushcraft knife” can be interpreted in different ways, it often means a knife that is overbuilt for general camping and especially bikepacking use.
Last fall I passed along to a friend a primary bushcraft blade I’d been using. He was in the market and I wanted to replace it with a lighter, smaller option that could still handle some rigorous duties like processing wood.
I’ve been using blades made by ESEE Knives for a long time. As a company they value no-frills function and durability. Their knives are reasonably priced, meant for serious use, and backed by a great warranty. All of which are things a SURLY fan can appreciate. I decided to begin my search among their product line.
Before I go any further I need to note something. It wasn’t just the attributes cited above that influenced my decision. It was ESEE’s relationship with their customers. More specifically it’s how they embody “Make It Your Own” in the knife world. They celebrate not only the myriad ways customers use their products, but also the quirky modifications they make along the way.
On the bike side of life, I am plenty comfortable with tinkering, swapping out parts, and modifying my setups to better suit my needs. But while I’ve been using knives since I was a wee lad I’ve tended to view the factory product as the be-all and end-all in terms of design and features. In other words, keep it properly maintained and carry on.
A lot of ESEE knife owners don’t see it that way. In user groups and on forums, I’ve followed many of the most popular and utilitarian mods. That inspired me in much the same way we know “Make It Your Own” inspires SURLY riders. Options abound and I was in good company to explore them.
Let’s suffice it to say I didn’t find a stock ESEE knife that fit exactly what I wanted. Guided by the example (not to mention the virtual instruction) of those who are well versed in knife modifications, however, I was able to make my vision a reality.
What follows is the process I used to achieve a semi-custom knife that does the things I need a woods knife to do most often. Along the way I’ll briefly explain why I made the choices I did.
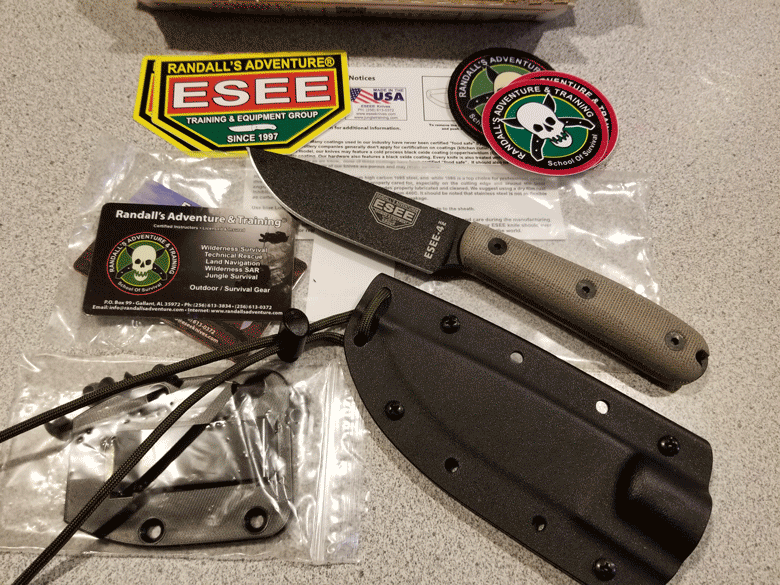
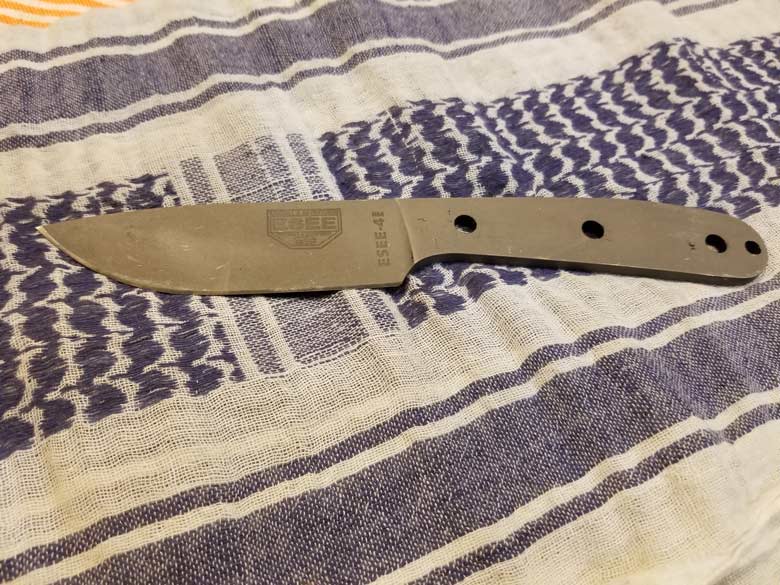
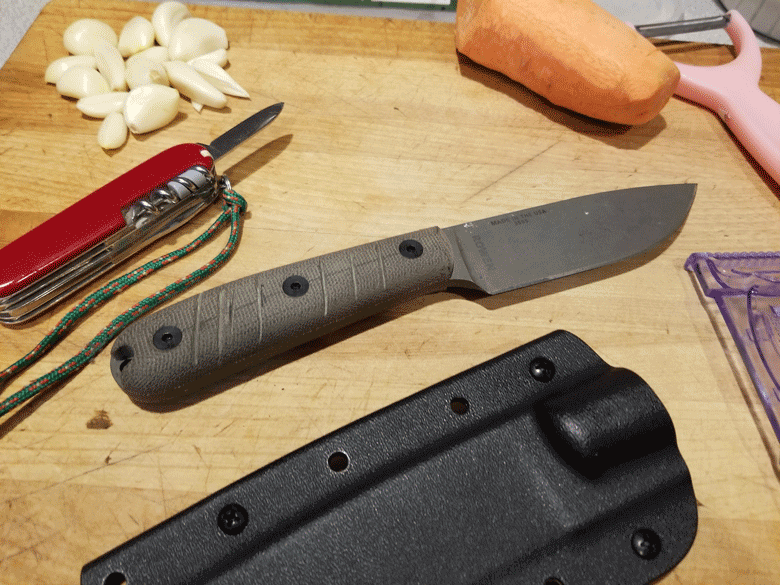
Mail call! It’s just like the “new refrigerator moment” I described in Part I of this blog. Exciting times! For those keeping score at home I chose an ESEE 4HM.
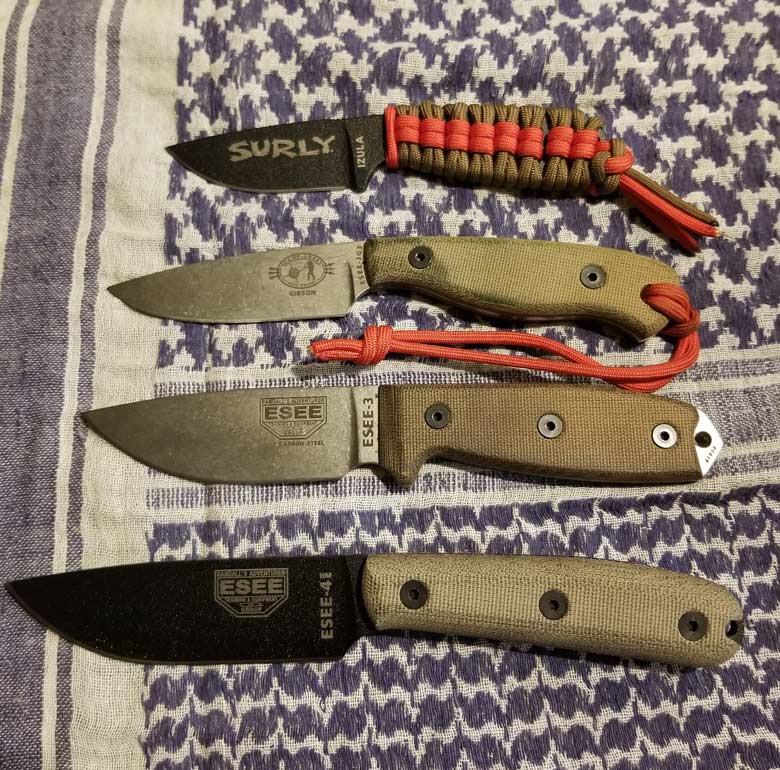
A few ESEE knives from top to bottom:
Izula – a custom-run, SURLY logo version with my own paracord handle
JG-3 – a fantastic all-around camp blade
ESEE 3 – another compact and capable design (which was a very close second for this project)
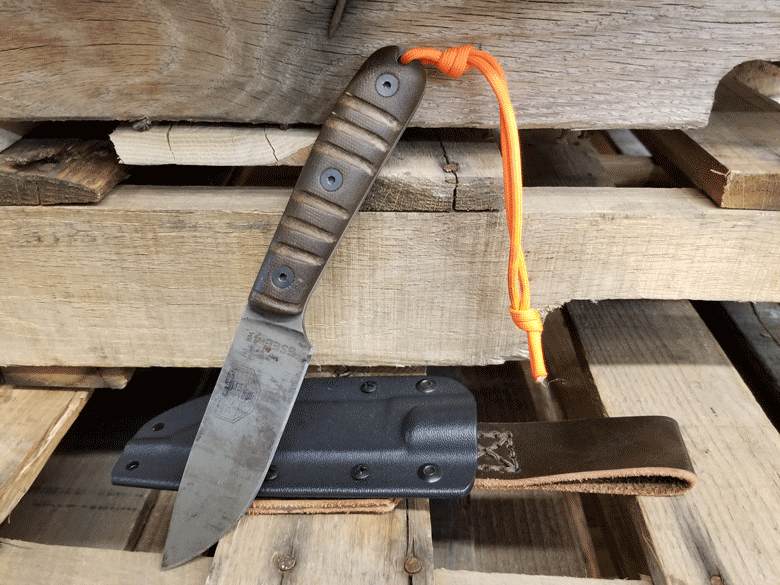
4HM – this project knife has a longer, rounded handle and a thicker blade than the other models, making it a burly yet still sensibly sized knife
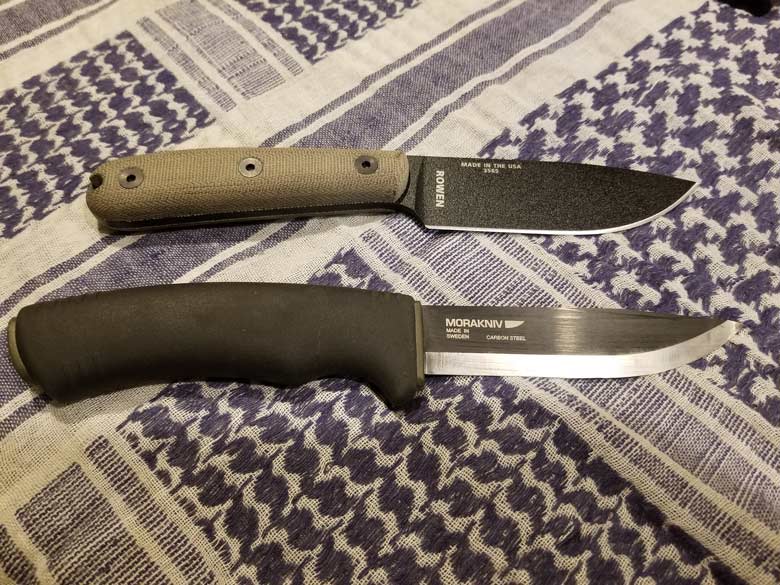
Here’s the 4HM alongside one of my absolute favorite woods knives, the Mora Bushcraft. The Mora is an astonishingly lightweight yet capable tool that is always on my belt or in my bag on bikepacking trips. It’s also one of the best values on the market.
Much of what I was looking for from this ESEE project was informed by the Mora. Chief among those features was a carbon steel blade at least 4” (102mm) long. While I’ve driven the Mora through some chunky logs with a remarkable lack of incident (i.e. blade failure), I wanted a stouter blade. The ESEE is thicker at 3/32” (4.8mm) and has a heft that is reassuring on the business end of a baton.
![]()
ESEE powder coats most of their knife blades. This has advantages since one of their materials of choice is 1095 carbon steel. Carbon steel will readily rust, so painting it protects the metal’s surface. That said, a lot of knife nuts look past such a “plain” steel, seeking instead the wunder-materials companies use to bedazzle customers. (Sound familiar?)
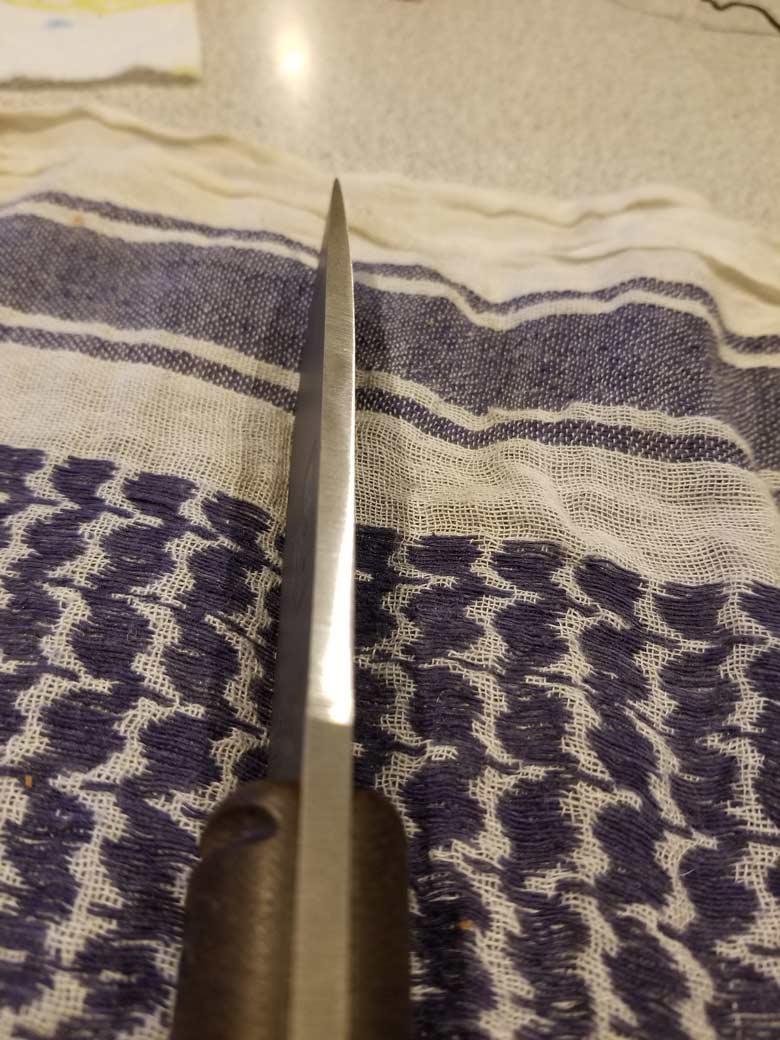
I am an exuberant front-row-sitting, popcorn-spilling fan of 1095 carbon steel. Properly heat-treated, it is fantastically durable and user-friendly in terms of maintenance. I wanted an uncoated finish, however. I’d have to strip the paint. More on why I chose that later.
Before I proceeded to remove the powder coat I was intrigued to try out a technique of acid-etching the factory-applied logos on the blade. Those are laser-etched. Acid-etching deepens them making it less likely they’ll be scrubbed from the blade with use.
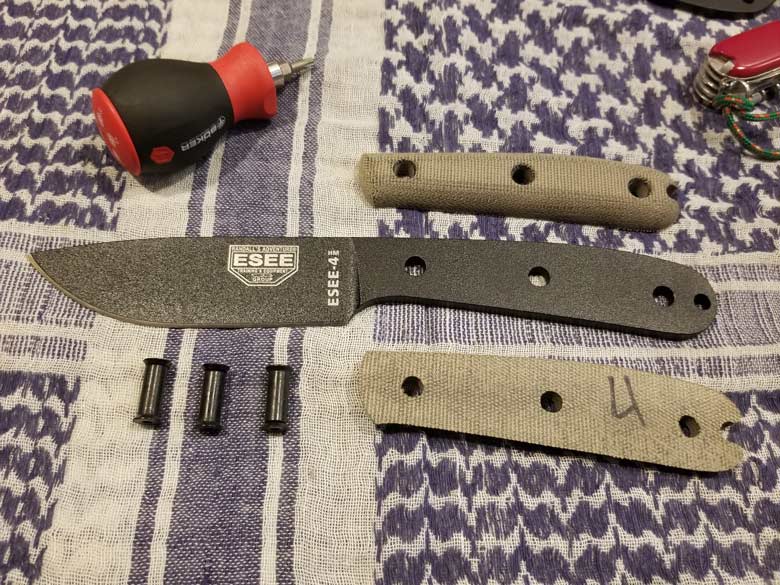
First the knife must be disassembled. Keep in mind hex wrenches might not work since the majority of knife companies are using Torx bolts. This hardware is specific to the handle, so it’s best not to start off by stripping bolt heads!
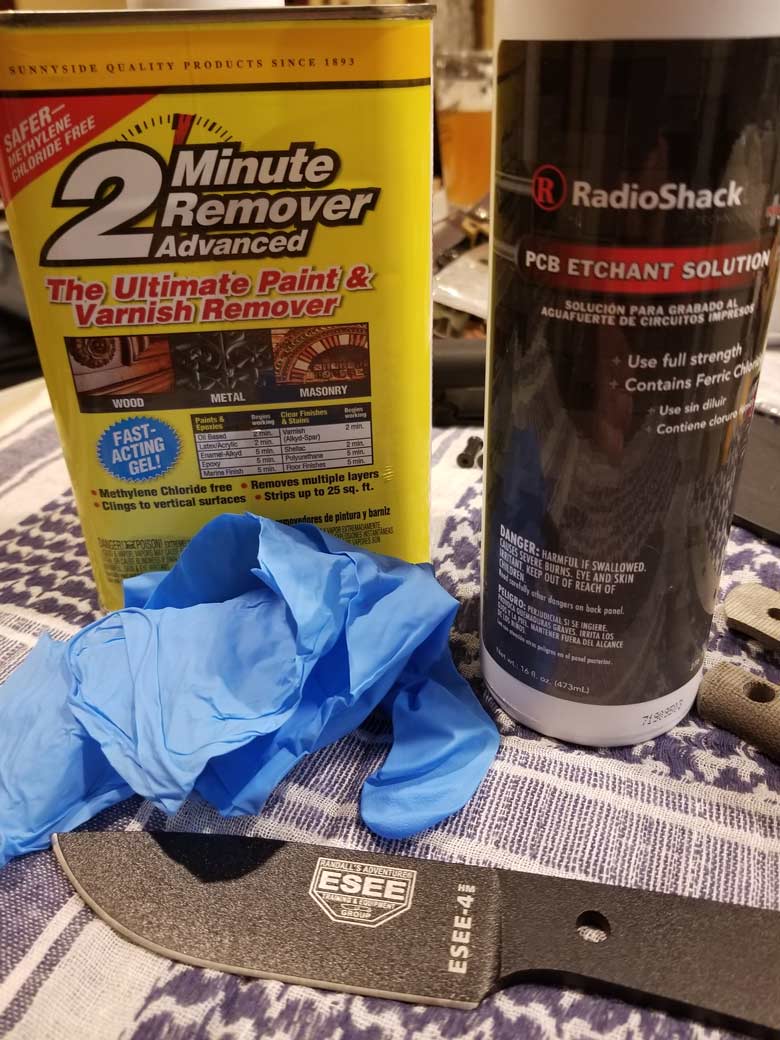
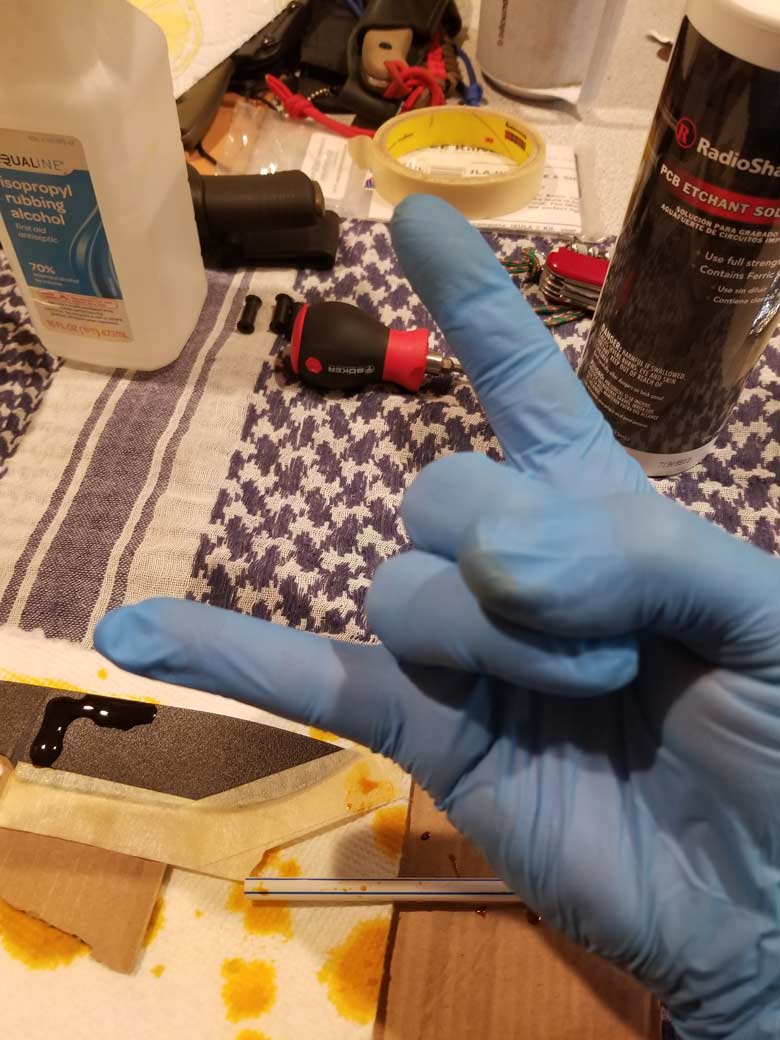
These preparatory steps took a couple of weeks. I had to do some research and procure some solutions I don’t just keep on the shelf in my workshop.
I’m no chemist, so I decided to order an etching acid that was ready to use. It turns out that Radio Shack is still in business! Their PCB Etchant is a preferred carbon-steel-etching solution for many knife enthusiasts.
The paint stripper came from my local home-improvement chain. There are plenty of options including citrus-based paint strippers. If I had to do it all over again I would have searched for a citrus solution. I’ll dissect that further below.
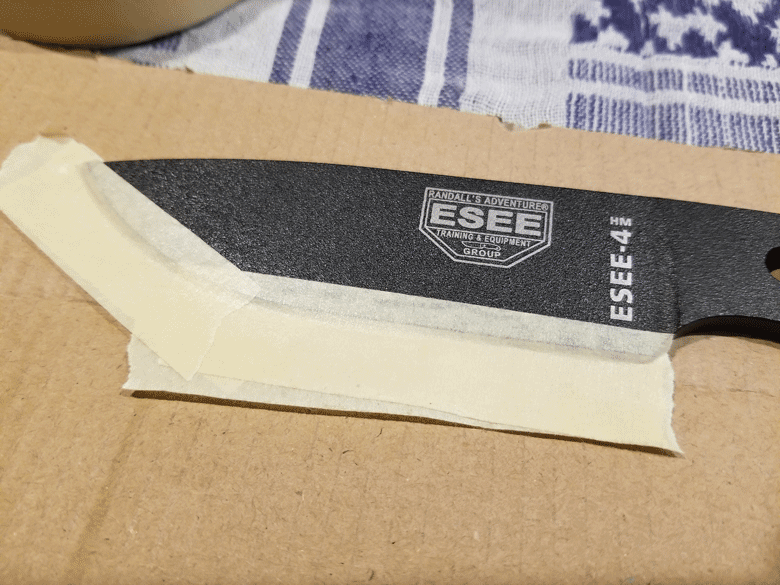
When applying acid, it’s important to note that dropping it onto any unprotected surface will produce unwanted results. With the ESEE knife blade everything except the laser-etched logos and the honed edge is coated at this point. I wanted to etch the logos but not the edge. Therefore, it’s necessary to tape off that edge.
An old friend who was a river guide once told me a great joke that I’ve never forgotten.
Guide: “You know what’s funny about safety?”
Me: “Hmm, no. What’s funny about safety, Charlie?”
Guide: “NOTHING.”
Protect yourself if you’re going to use these chemicals.
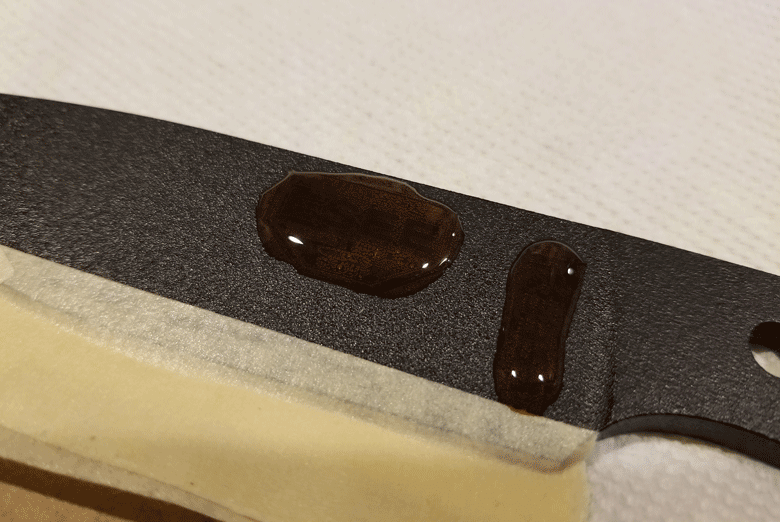
The acid has been pooled around the logos. It will slowly turn a dark gray color, meaning it has released steel into the solution. Which is so … METAL! This part takes some time and is completely dependent on how deep you decide to etch the logos. I completed four acid treatments for about eight hours total etching time.
![]()
Finished etching. Just like a good deep fry, these edges are crispy! That’s what we’re talking about.
Rarely have I worked with paint stripper. This go-round made me happy that I don’t often have to. I tackled this step in the middle of January in Minnesota. I hadn’t fully thought that through. Stripping paint is a temperature-sensitive operation. Therefore, my unheated garage was out of the question. I chose a time when the family was out, opened a window in the kitchen, and worked quickly. Once the powder coat softened I scraped it with a plastic putty knife.
Again, next time I’ll source a citrus-based stripper. The solvent-based one I used was not friendly to my pan, the scraper, or my nitrile gloves.
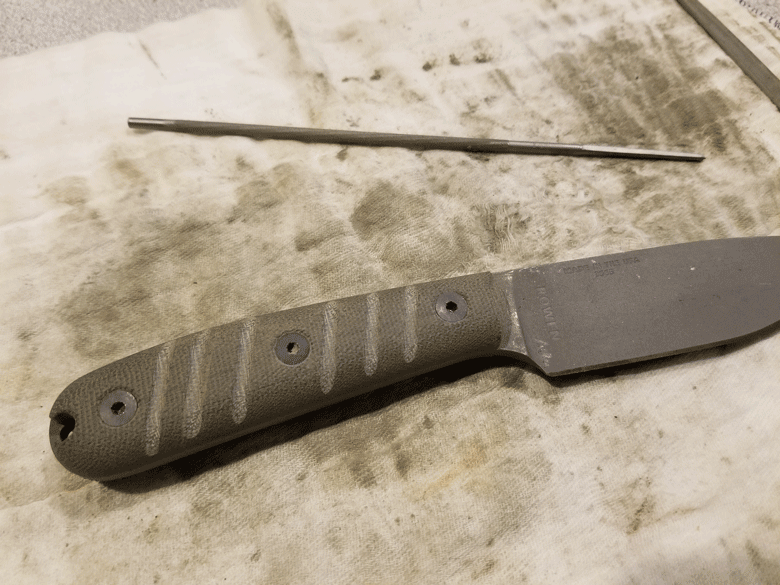
Why did I strip the powder coat from the blade? Mainly it’s a personal preference. I like the look of raw steel knife blades. At this point it could be polished. I plan to leave it a dull matte gray.
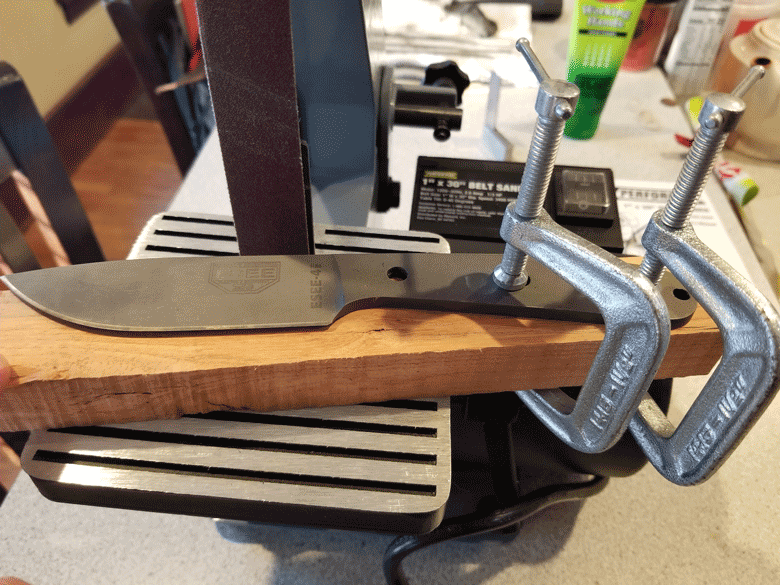
Another reason I stripped the blade was because I planned to grind the spine to a sharp 90-degree corner. This required removing some of the powder coat anyway so I decided to strip it all. I clamped the bare blade to a reference block and used a benchtop belt sander to grind it.
These sharp corners are used to scrape things like bark or used to strike a ferro rod for fire starting. They provide additional non-critical edges for completing tasks that would otherwise dull and possibly damage the cutting edge.
Of course, I could have stopped here. The factory scales of the ESEE 4HM are very comfortable. But since I was taking so many steps to transform this knife according to my vision I was keen to modify the handle design.
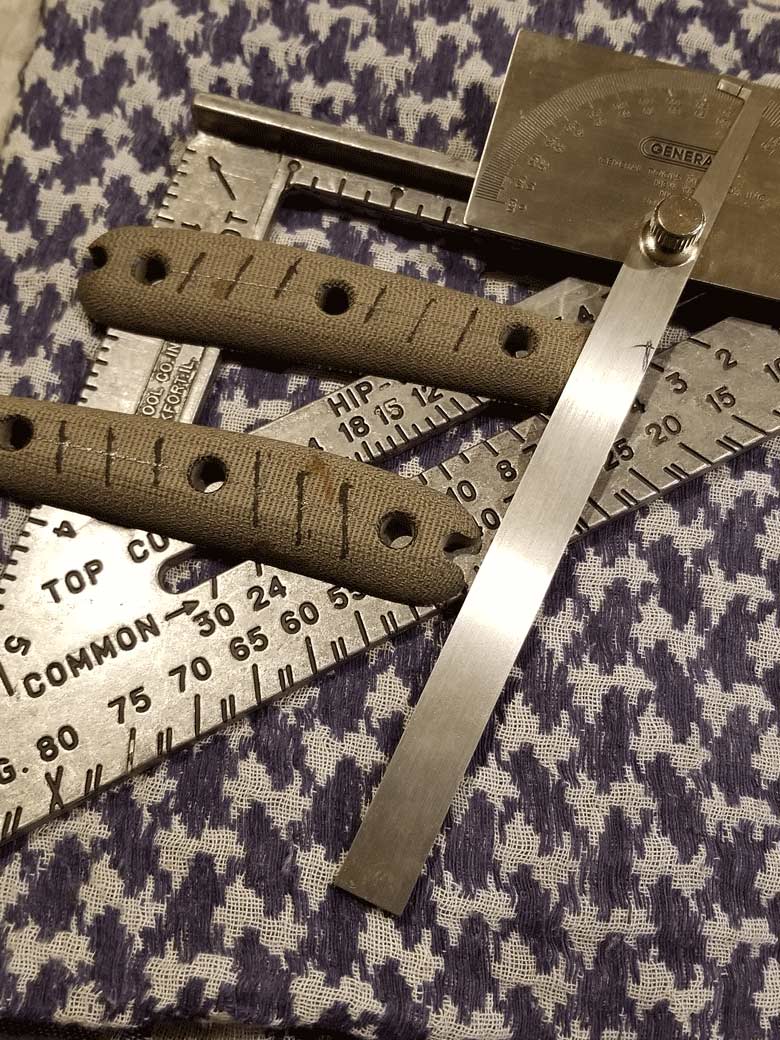
My layout process might appear precise but the execution was less so. The goal was to introduce some angled grooves to enhance grip traction. I thought they might also look neat. I’ve never worked with micarta. It’s pretty hard stuff. The canvas layers also create a wood-like directional grain structure. Micarta also has a distinctive and not entirely unpleasant odor. I like it. Maybe that’s just me?
A few basic files (small triangular and two chainsaw files) made a quick mess but did the trick. I could have taken the knife to a vise to stabilize everything while filing. That would have required trekking out to the cold garage though! Again, this was all a learning process. I can always get fresh scales later should I change my mind.
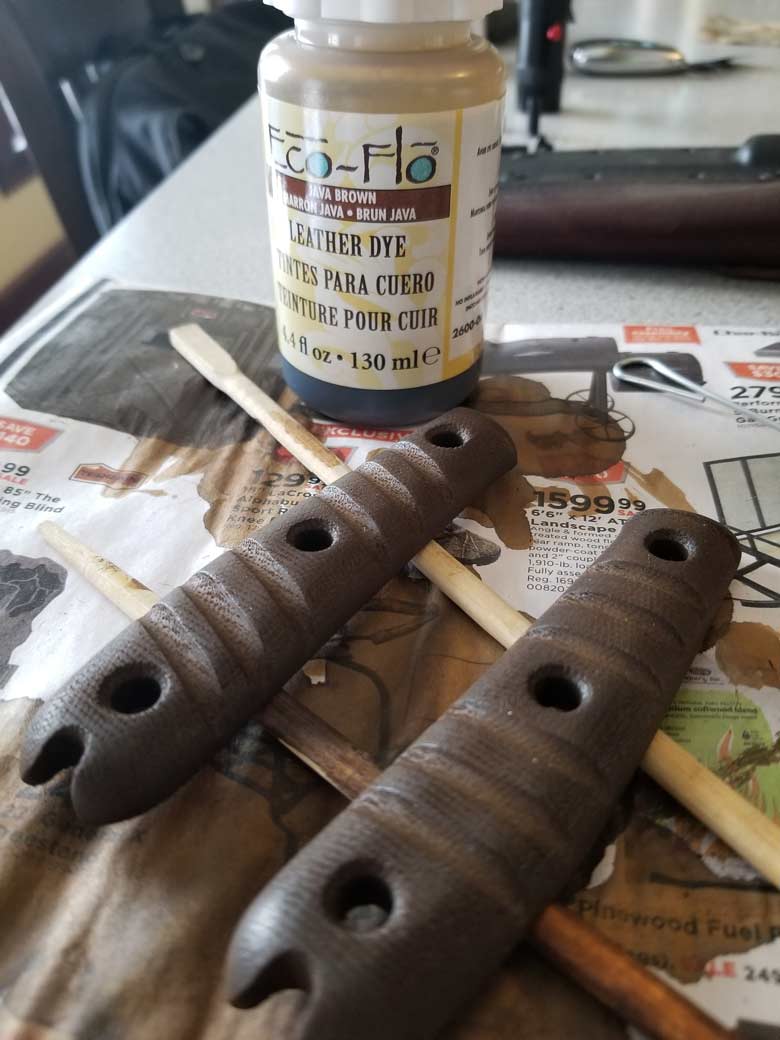
Since I planned to add some leather to the Kydex sheath I sought to add a traditional look to the knife by dying the scales brown. Some leather dye I had on hand worked just fine on the micarta. After all was dry I sealed the scales with some paste wax.
Yeehaw! We’re getting close to completion. While I’m calling out lessons learned, I’ll mention that forward-most groove I filed into the scale. I’m right-handed. This small groove is intended to be a thumb index for alternate grips. That also happens to be the spot where the handle clicks into the Kydex sheath. Thanks to that groove, the knife is now a little loose in its sheath. I’ll fashion some sort of security loop for secondary retention to prevent unintentional deployment of my blade.
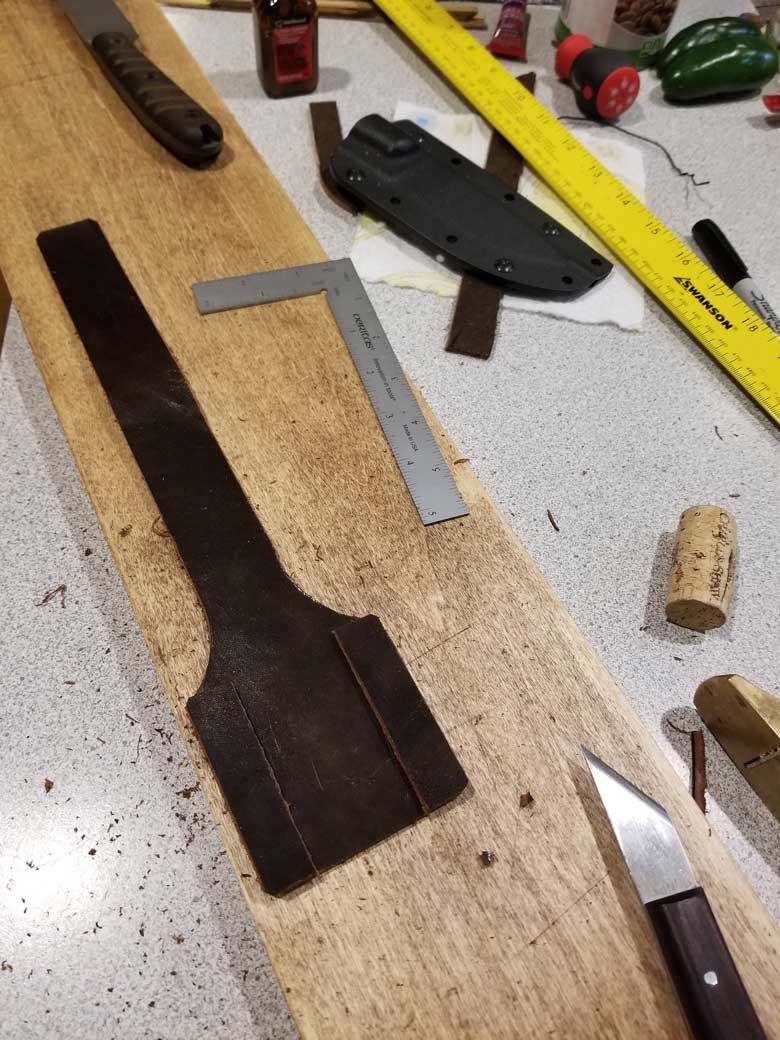
As I’ve mentioned the knife came with a Kydex sheath as well as a modular clip that bolts onto the sheath. This creates a high position for belt carry. I wanted a lower carry position. To achieve that I grabbed some scrap leather and crafted a backer with an integrated belt loop.

I matched the drilling pattern on the Kydex sheath and punched appropriate diameter holes to accommodate the hardware included with the modular belt clip.
Many thanks to Shane Adams at ESEE for his input on the sheath selection. I initially wanted to get the knife with a leather sheath. However, Shane pointed out that the Kydex can be adapted to all kinds of carrying and mounting configurations. Versatility is a good thing.
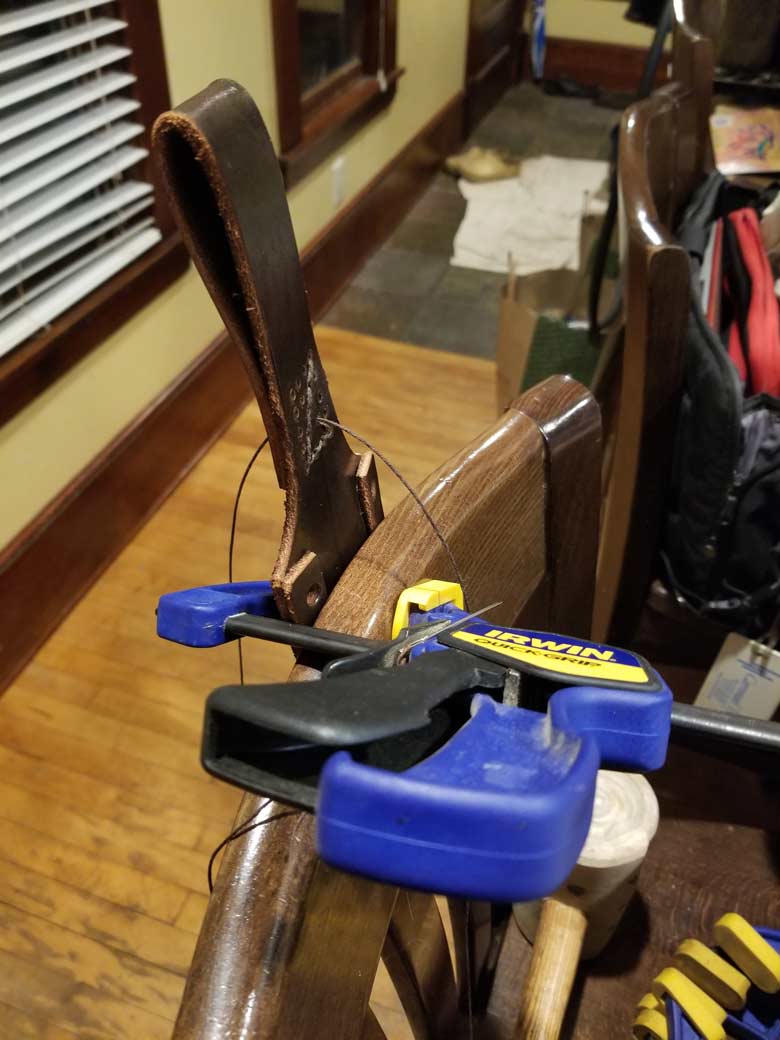
I’m a hack at leather work. I own just enough tools to be dangerous. One of these days I’ll make a stitching pony, but for this project a clamp and a high chair back worked just fine.
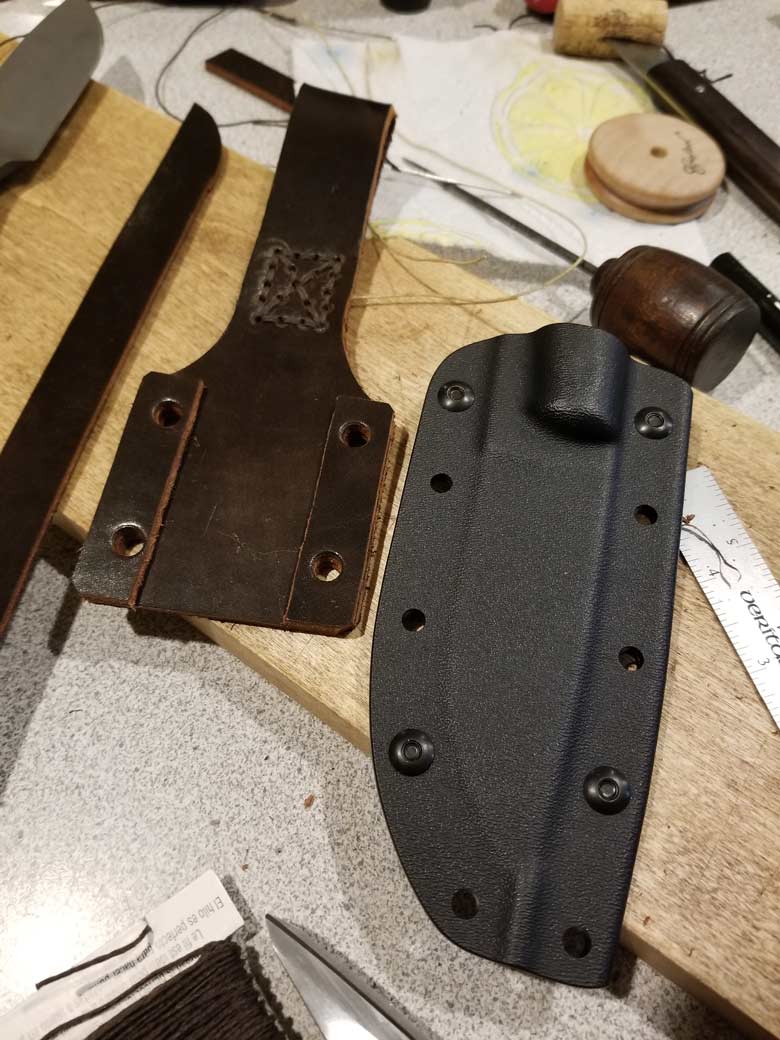
Voila! A finished backer ready to be installed on the sheath. The hardware provided with the modular clip worked great for the leather backer. No need to source extra bolts.
At this point I threaded the sheath assembly onto a belt to test the fit. The long loop on the backer rides low and provides plenty of flexibility for walking and bending. I’ll get around to that secondary retainer loop in the very near future.

Maybe it was silly but I made myself wait until the project was completed before taking the knife into the field. I was committed to all the modifications anyway, so I reasoned it was best to get to know the version I had made my own.
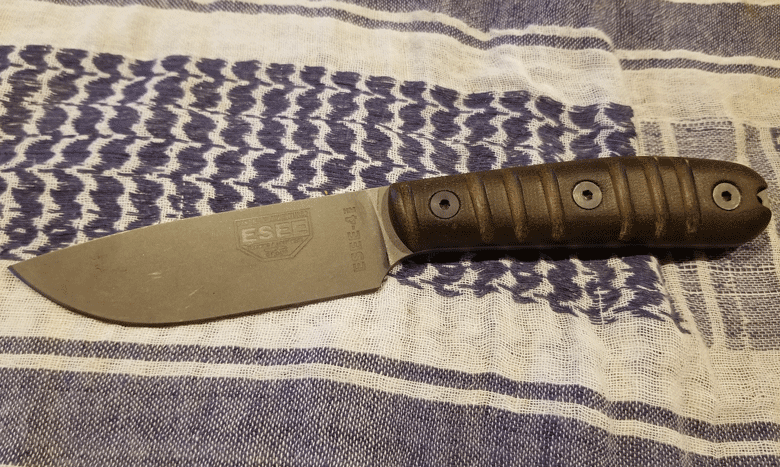
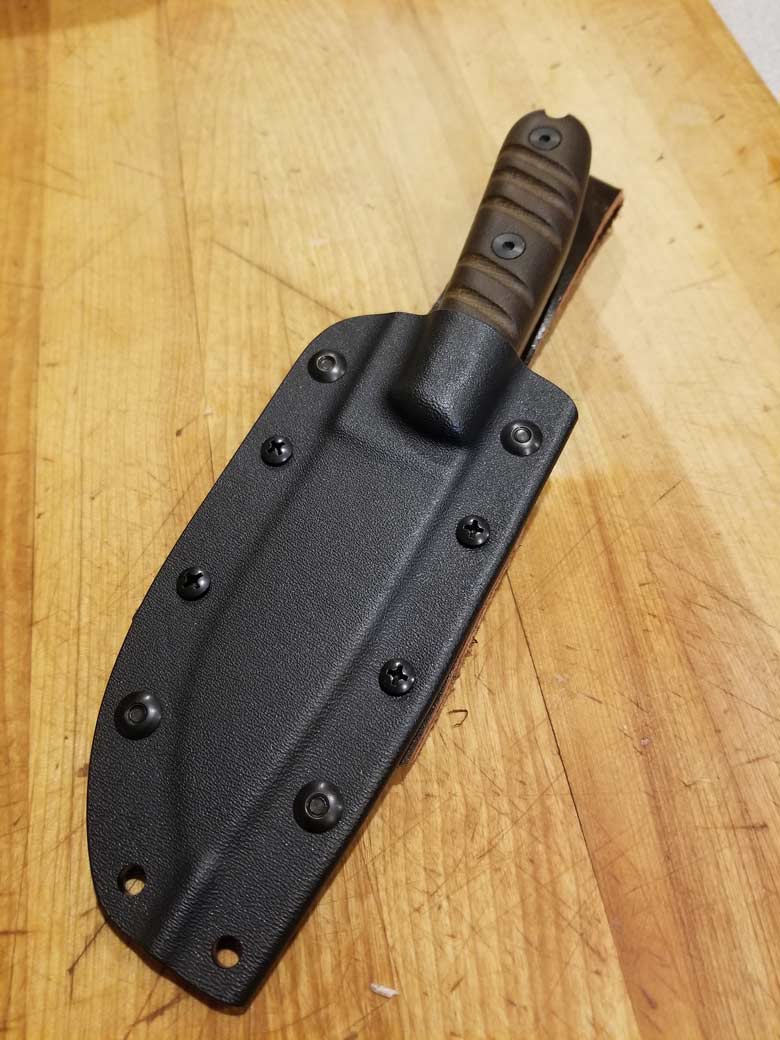
I really like this knife. More importantly the changes I made to it match what I identified would better suit my needs. This is the go-to blade I had been looking for.
After splitting a few logs with it, that uncoated blade is already showing some patina. Not everyone likes that look and that’s okay. This ESEE 4 is uniquely my own. If you ask nicely maybe I’ll let you borrow it next time we’re in the woods together.
About Fleck

Meet John, Surly’s Global Sales Manager & Domestique. Long ago, John worked for Surly in a customer service and sales capacity, long before Surly had any sort of proactive sales plans or programs. Most recently however, he honed that experience by building relationships and selling bicycles and bicycle accessories to people outside the U.S. of A. He returns now with a wealth of knowledge about Surly, about the needs and habits of bike shops and about the clockwork orange that is global and domestic sales markets. John’s hobbies include woodworking, riding bicycles, positively focused skepticism, being a dad, Buddhism, making good food and eating good food.